Browser
Requirements
Before you start, you must complete the Clients repository setup instructions.
Build instructions
We now recommend using Nx commands for building projects. For the browser extension:
# Build and watch (chrome is the default)
npx nx serve browser
# Build and watch for specific browsers
npx nx serve browser --configuration=firefox-dev
npx nx serve browser --configuration=safari-dev
For complete Nx documentation and all available commands, see Using Nx to Build Projects.
-
Build and run the extension:
cd apps/browsernpm run build:watchnoteThe build commands use Manifest v3 by default. If you are building for a non-Chrome browser like Firefox or Safari, you should use the command
npm run build:watch:<browser client name>instead. -
Load the unpacked browser extension in your browser using the instructions in the next section.
Environment setup
By default, the browser extension will run pointing to the production server endpoints. To override this for local development and testing, there are several options.
Using managedEnvironment
The browser extension has the concept of a "managed environment", which is JSON configuration stored
in
development.json,
within the devFlags object.
The managedEnvironment setting allows the contributor to override any or all of the URLs for the
server. The managedEnvironment is read in the
BrowserEnvironmentService
and overrides the default (production) settings for any supplied URLs.
There are two ways to use managedEnvironment, depending upon whether you will also be running the
web vault at the same time.
managedEnvironment with web vault running
If you are also running the web vault, you only need to set the base URL in the
managedEnvironment:
{
   "devFlags":{
      "managedEnvironment":{
         "base":"https://localhost:8080"
      }
      ...
   }
   ...
}
This is because the web vault includes the webpack-dev-server package in its
webpack.config.js.
When it is running, it proxies each of the endpoints based on the settings configured in its own
development.json
configuration file:
  "dev": {
    "proxyApi": "http://localhost:4000",
    "proxyIdentity": "http://localhost:33656",
    "proxyEvents": "http://localhost:46273",
    "proxyNotifications": "http://localhost:61840"
  },
This means that when the web vault is running, the browser managedEnvironment does not need to
override each of the URLs individually. The browser will format each URL as {base}/{endpoint},
such as http://localhost:8080/api, but the webpack DevServer will proxy that URL to the correct
port, like http://localhost:4000.
managedEnvironment without web vault running
If you are testing the browser extension without the web vault running, you will not be able to
take advantage of the webpack DevServer to proxy the URLs. This means that your managedEnvironment
setting must explicitly override all of the URLs with which you are going to be communicating
locally.
{
    "devFlags": {
        "managedEnvironment": {
            "webVault": "http://localhost:8080",
            "api": "http://localhost:4000",
            "identity": "http://localhost:33656",
            "notifications": "http://localhost:61840",
            "icons": "http://localhost:50024"
        }
        ...
    }
    ...
}
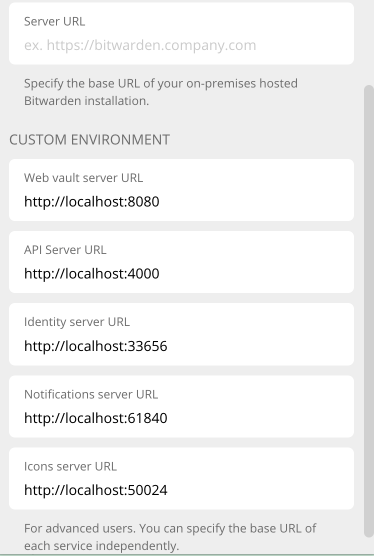
Manually setting the Custom Environment URLs
You may want to adjust the server URLs to point to your local server once you have loaded the
extension instead of overriding them in managedEnvironment. You can change this through the
browser settings. You can see instructions on how to configure the URLs
here.
Once configured, your local Custom Environment should look like this:
Testing and debugging
Chrome and Chromium-based browsers
To load the browser extension build:
-
Build the extension for Chrome:
npm run build:watch -
Navigate to
chrome://extensionsin your address bar. This will open the extensions page -
Enable “developer mode” (toggle switch)
-
Click the “Load unpacked” button
-
Open the
buildfolder of your local repository and confirm your choice
You will now have your local build of the browser extension installed.
You can debug the background page of the browser extension by clicking “background.html” underneath
the Bitwarden heading in chrome://extensions. You can debug the popup by right-clicking it while
it is open and clicking “Inspect”.
Firefox
To load the browser extension build:
-
Build the extension for Firefox:
npm run build:watch:firefox -
Navigate to
about:debuggingin your address bar. This will open the add-on debugging page -
Click “This Firefox”
-
Click “Load Temporary Add-on”
-
Open the
buildfolder of your local repository and open themanifest.jsonfile
You will now have your local build of the browser extension installed.
The temporary add-on will only be installed for the current session. If you close and re-open Firefox, you will have to load the temporary add-on again.
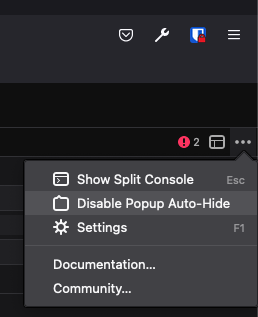
You can debug the background page of the browser extension by clicking the “Inspect” button next to the Bitwarden heading in the Temporary Extensions page. To debug the popup:
-
Inspect the background page using the instructions above
-
Click the “three dots” in the top right-hand corner of the debugger and click “Disable Pop-up Auto-hide”
-
Open the extension popup
-
Click the “iframe” button (next to the “three dots”) and select “/popup/index.html”
Safari
To load the browser extension build:
-
Build the extension for Safari:
npm run build:watch:safari -
Open Safari and navigate to
Safari -> Settings -> Developer -
Click “Allow unsigned extensions”
-
Click “Add Temporary Extension...”
-
Open the
buildfolder of your local repository
You will now have your local build of the browser extension installed.
The temporary extension will only be installed for the current session. If you close and re-open Safari, you will have to load the temporary extension again.
You can debug the background page of the browser extension by clicking
Develop -> Web Extension Background Pages and then selecting Bitwarden. You can debug the popup by
right-clicking it while it is open and clicking "Inspect Element".
Production build
The other alternative is to use the "proper" build process through gulp. This method doesn't require any manual processing of the output since gulp does it for us. However we have to completely rebuild the extension for every change, which is slower.
-
Build the extension for Safari
npm run dist:safari -
Open Safari and check Settings to confirm that the extension is installed and enabled
You may need to Configure Safari in macOS to Run Unsigned Extensions.
To enable debugging:
- Click “Settings” and then click the “Advanced” tab
- Enable “Show Develop menu in menu bar”
You can debug the background page of the browser extension by clicking
Develop -> Web Extension Background Pages and then selecting Bitwarden. You can debug the popup by
right-clicking it while it is open and clicking "Inspect Element".
This should be enough for most debugging and testing, unless you're working in native code.