Commit signing
It's possible to configure git with any name and email, enabling bad actors to spoof commits and impersonate whomever they want. GitHub supports several ways to digitally sign git commits, verifying that they came from someone with access to a previously configured private key.
For example, on 3 August 2022, Stephen Lacy shared on Twitter how he uncovered a massive malware attack on GitHub by noticing unverified commits (i.e. commits that were not digitally signed).
To protect against commit spoofing, all Bitwarden contributors are encouraged to digitally sign their commits.
Setting up commit signing
GitHub supports commit signing with SSH, GPG, and S/MIME.
If you're unsure what to use, we recommend you create a commit signing key using SSH per latest security best practices (see the PGP problem for more details). For maximum security, consider using a hardware-backed SSH key (YubiKey or other FIDO2 device) as your signing key.
Standard SSH key configuration
-
Ensure you have globally configured your git email address:
-
Generate an SSH key for commit signing:
# path to save your private signing keyKEY_FILE=~/.ssh/bw-signingssh-keygen -f $KEY_FILE -C "$(git config --global --get user.email)" -t ed25519tipRemember to protect the key with a strong passphrase or password. Alternatively set up a hardware key as your signing key.
-
Configure git to sign using SSH.
git config --global gpg.format sshgit config --global user.signingkey "${KEY_FILE}.pub" -
Follow the SSH GitHub documentation to configure commit signing
-
Configure your preferred git tool below (CLI, VS Code, SourceTree)
-
Push a test commit to GitHub and ensure that the "Verified" badge appears next to the commit description:

-
(Optional) See Store your passphrase in your OS keychain below to avoid being prompted for your SSH key passphrase every time you sign a commit.
Use Bitwarden SSH agent
Import your SSH key into Bitwarden desktop. Then, follow our guide on configuring the desktop app for SSH authentication and Git commit signing. This ensures your SSH keys are available while your vault is unlocked.
Store your passphrase in your OS keychain
macOS
On macOS, you can use the built-in Keychain to store your SSH key passphrase so you don't have to enter it every time you sign a commit.
-
Add your SSH key to the ssh-agent and store your passphrase in the Keychain:
ssh-add --apple-use-keychain ~/.ssh/bw-signingssh-add -l # verify the key was added -
The above command will need to be run each time you restart your computer. If you would like to automate this process, then you can leverage LaunchAgents to run the command on startup.
a. Ensure the LaunchAgents directory exists:
mkdir -p ~/Library/LaunchAgentsb. Create a new plist file for the LaunchAgent:
USER_NAME=$(whoami)cat > ~/Library/LaunchAgents/com.ssh-add-bw-signing.plist <<PLIST<?xml version="1.0" encoding="UTF-8"?><!DOCTYPE plist PUBLIC "-//Apple//DTD PLIST 1.0//EN" "http://www.apple.com/DTDs/PropertyList-1.0.dtd"><plist version="1.0"><dict><key>Label</key><string>com.ssh-add-bw-signing</string><key>ProgramArguments</key><array><string>/usr/bin/ssh-add</string><string>--apple-use-keychain</string><string>/Users/${USER_NAME}/.ssh/bw-signing</string></array><key>RunAtLoad</key><true /></dict></plist>PLISTc. Validate that your plist is valid:
plutil -lint ~/Library/LaunchAgents/com.ssh-add-bw-signing.plist# you should see: "OK"d. Configure
launchctlto enable the new LaunchAgent for your next restart:launchctl bootstrap gui/$(id -u) ~/Library/LaunchAgents/com.ssh-add-bw-signing.plistlaunchctl enable gui/$(id -u)/com.ssh-add-bw-signinge. You can kickstart the LaunchAgent and confirm it will work by running (only works if you haven't loaded your key yet):
launchctl kickstart -k gui/$(id -u)/com.ssh-add-bw-signingssh-add -l # verify the key was addedf. Restart your computer to verify that the LaunchAgent works as expected. After restarting, run
ssh-add -lto verify that your key was added to the ssh-agent automatically.
Hardware-backed SSH key configuration
For contributors who want maximum security, hardware-backed SSH keys using FIDO2/U2F security keys (like YubiKeys) provide superior protection by storing private keys on hardware that cannot be extracted or copied.
Benefits of hardware-backed keys
- Physical presence required: Each signing operation requires touching the hardware key
- Locked private keys: Private keys are generated on and never leave the hardware
- Tamper-resistant: Hardware provides protection against physical and software attacks
- Multi-factor authentication: Combines something you have (the key) with something you know (PIN)
Setting up sk-ed25519 keys
On macOS, you'll need to install OpenSSH via Homebrew as the system's built-in OpenSSH lacks proper FIDO2 support:
brew install openssh
After installation, restart your terminal to ensure the Homebrew version is used. If it's not then
fully qualify the path to the homebrew version of ssh-keygen in the example, like
/opt/homebrew/bin/ssh-keygen [everything else].
-
Generate an sk-ed25519 key for commit signing:
# Generate hardware-backed signing keyssh-keygen -t ed25519-sk -f ~/.ssh/bw-signing-sk -C "$(git config --global --get user.email)"noteYou'll need to touch your security key when prompted during key generation and each time you sign a commit.
-
Configure git to use your hardware-backed key:
git config --global gpg.format sshgit config --global user.signingkey ~/.ssh/bw-signing-sk.pubgit config --global commit.gpgSign truegit config --global tag.gpgSign true -
Add the public key to your GitHub account following the GitHub documentation
Hardware key requirements
- FIDO2/U2F compatible security key (YubiKey 5 series, SoloKeys, etc.)
- OpenSSH 8.2+ with FIDO2 support (on macOS, install via Homebrew:
brew install openssh) - Physical access to the security key for each signing operation
Fallback strategy
When going the hardware key route it is important to make sure you have the infrastructure set up to recover from the loss of a hardware key. At least one backup plan should be set up. Some ideas:
- Create and configure multiple hardware keys
- Generate both a hardware-backed key and a traditional SSH key:
- Use the hardware-backed key for day-to-day development
- Keep a traditional SSH key as a secure backup for emergency situations
Commit signing with git CLI
-
After configuring commit signing, you can sign a commit by using the
-Sflag:git commit -S -
To avoid using the
-Sflag every time, you can sign all commits and tags by default:git config --global commit.gpgSign truegit config --global tag.gpgSign true
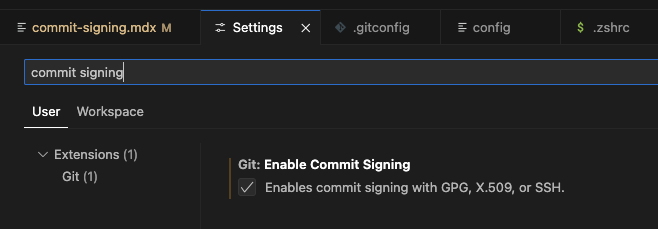
Commit signing with Visual Studio Code
-
Open Preferences → Settings
-
Search for “commit signing”
-
Enable commit signing
macOS: GPG Key Passphrase Prompt Issue
Some macOS users have had issues with VS Code and the gpg-agent not prompting for the GPG Key
Passphrase in order to sign commits when using the VS Code git GUI. This is illustrated by VS Code
displaying an error popup message: Git: gpg failed to sign the data.
A workaround for this issue is to configure your gpg-agent to use pinentry for macOS in order to force a secure prompt. Run the following in a terminal of your choice:
-
Install pinentry-mac:
brew install pinentry-mac -
Configure gpg-agent to use pinentry-mac:
echo "pinentry-program $(which pinentry-mac)" >> ~/.gnupg/gpg-agent.conf -
Restart gpg-agent:
killall gpg-agent
Note: Note: you might have to restart VS Code for this to take effect, but you should now be prompted for your GPG Key Passphrase as needed. If this does not solve your issue, please follow the GPG Key Troubleshooting guide below.
Commit signing with SourceTree
Refer to Setup GPG to sign commits within SourceTree.
GPG Key Troubleshooting
If you see the following error:
error: gpg failed to sign the data
Make sure you’ve added the following to your shell config:
export GPG_TTY=$(tty)
- For zsh, add it to
~/.zshrc - For bash, add it to
~/.bashrc
After updating the file, restart your terminal for the change to take effect.
More help with this error
See this troubleshooting guide.